- Kibana 指南其他版本
- 什么是 Kibana?
- 8.17 版本的新增功能
- Kibana 概念
- 快速入门
- 设置
- 生产注意事项
- Discover
- 仪表板
- Canvas
- 地图
- 报告和共享
- 机器学习
- Graph
- 告警
- 可观测性
- 搜索
- 安全性
- 开发工具
- Fleet
- Osquery
- 堆栈监控
- 堆栈管理
- REST API
- Kibana 插件
- 问题排查
- 辅助功能
- 发行说明
- 升级说明
- Kibana 8.17.0
- Kibana 8.16.1
- Kibana 8.16.0
- Kibana 8.15.5
- Kibana 8.15.4
- Kibana 8.15.3
- Kibana 8.15.2
- Kibana 8.15.1
- Kibana 8.15.0
- Kibana 8.14.3
- Kibana 8.14.2
- Kibana 8.14.1
- Kibana 8.14.0
- Kibana 8.13.4
- Kibana 8.13.3
- Kibana 8.13.2
- Kibana 8.13.1
- Kibana 8.13.0
- Kibana 8.12.2
- Kibana 8.12.1
- Kibana 8.12.0
- Kibana 8.11.4
- Kibana 8.11.3
- Kibana 8.11.2
- Kibana 8.11.1
- Kibana 8.11.0
- Kibana 8.10.4
- Kibana 8.10.3
- Kibana 8.10.2
- Kibana 8.10.1
- Kibana 8.10.0
- Kibana 8.9.2
- Kibana 8.9.1
- Kibana 8.9.0
- Kibana 8.8.2
- Kibana 8.8.1
- Kibana 8.8.0
- Kibana 8.7.1
- Kibana 8.7.0
- Kibana 8.6.1
- Kibana 8.6.0
- Kibana 8.5.2
- Kibana 8.5.1
- Kibana 8.5.0
- Kibana 8.4.3
- Kibana 8.4.2
- Kibana 8.4.1
- Kibana 8.4.0
- Kibana 8.3.3
- Kibana 8.3.2
- Kibana 8.3.1
- Kibana 8.3.0
- Kibana 8.2.3
- Kibana 8.2.2
- Kibana 8.2.1
- Kibana 8.2.0
- Kibana 8.1.3
- Kibana 8.1.2
- Kibana 8.1.1
- Kibana 8.1.0
- Kibana 8.0.0
- Kibana 8.0.0-rc2
- Kibana 8.0.0-rc1
- Kibana 8.0.0-beta1
- Kibana 8.0.0-alpha2
- Kibana 8.0.0-alpha1
- 开发人员指南
预配置连接器
编辑预配置连接器
编辑如果您在本地运行 Kibana,可以通过将其添加到 kibana.yml 文件中来预配置一个连接器,使其在启动之前拥有所有所需的信息。
Elasticsearch Service 提供了一个预配置的电子邮件连接器,但您不能创建其他预配置的连接器。
预配置连接器具有以下优点
- 无需设置。运行操作所需的配置和凭据已预定义,包括连接器名称和 ID。
- 它们不会作为保存的对象,因此会出现在所有空间中。
- 无法编辑或删除。
创建预配置连接器
编辑将 xpack.actions.preconfigured 设置添加到您的 kibana.yml 文件。设置因您添加的连接器类型而异。请参阅预配置连接器设置。
此示例显示了 Slack 连接器和 Webhook 连接器的有效配置
  xpack.actions.preconfigured:
    my-slack1:
      actionTypeId: .slack
      name: 'Slack #xyz'
      secrets:
        webhookUrl: 'https://hooks.slack.com/services/abcd/efgh/ijklmnopqrstuvwxyz'
    webhook-service:
      actionTypeId: .webhook
      name: 'Email service'
      config:
        url: 'https://email-alert-service.elastic.co'
        method: post
        headers:
          header1: value1
          header2: value2
      secrets:
        user: elastic
        password: changeme
|
键是连接器标识符,在本例中为 |
|
|
|
|
|
|
|
|
|
|
|
|
敏感属性(例如密码)也可以存储在 Kibana 密钥库 中。
查看预配置连接器
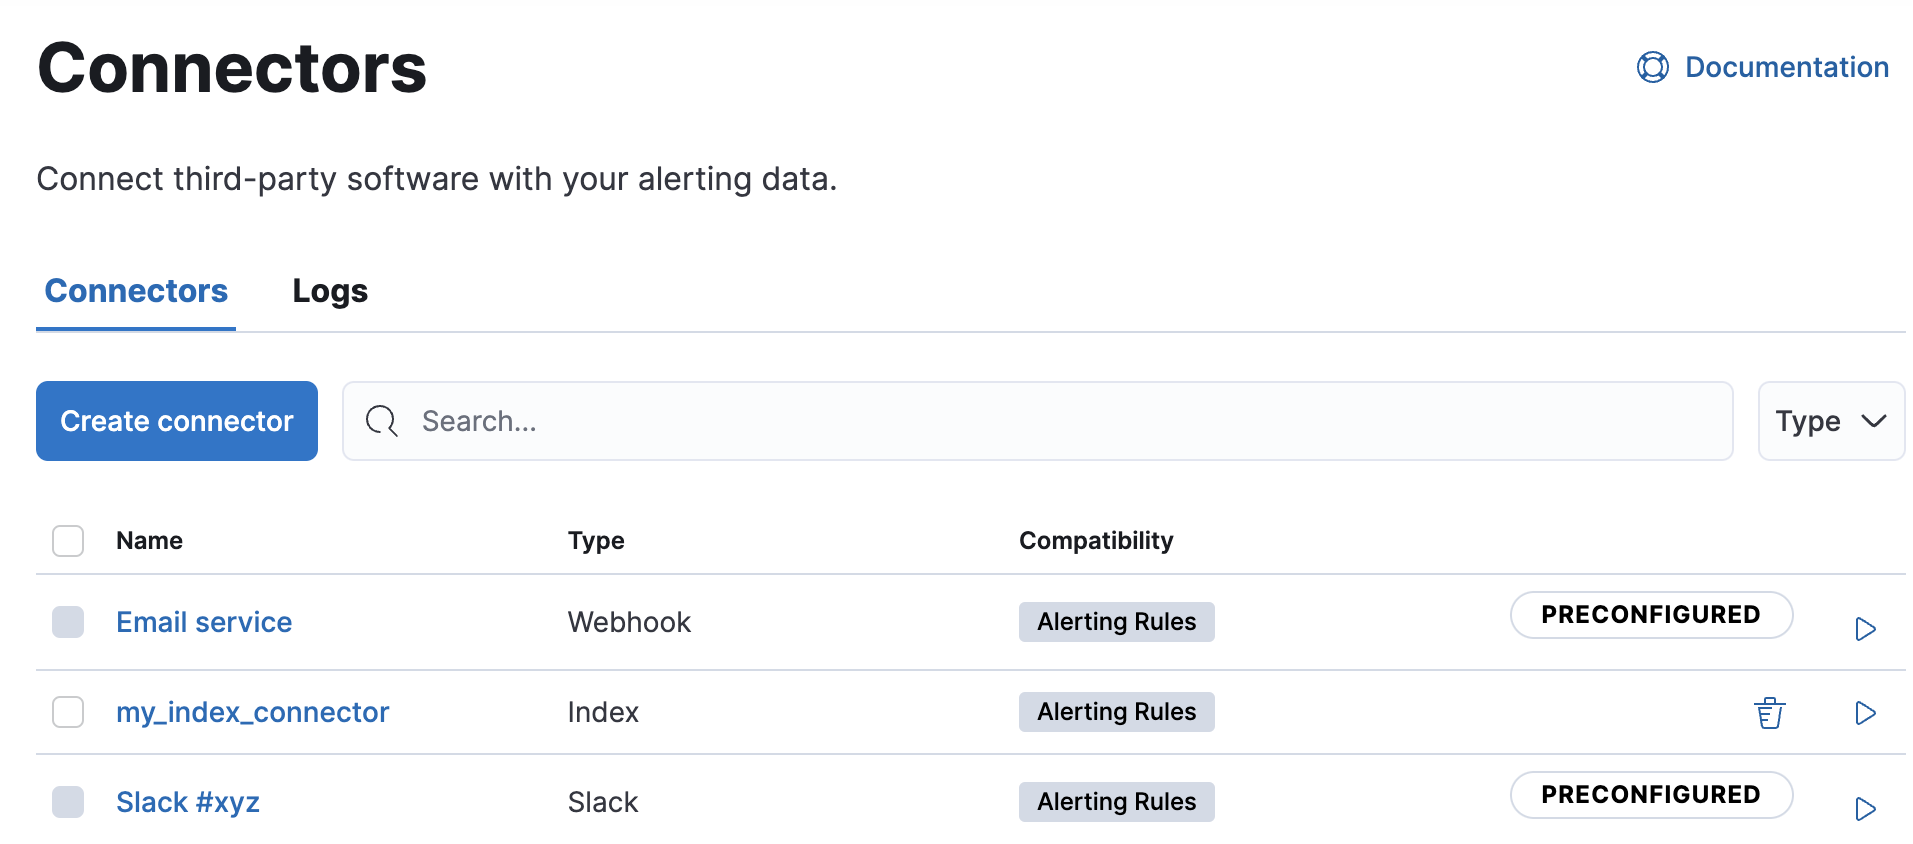
编辑使用导航菜单或全局搜索字段转到连接器页面。预配置的连接器会出现在您所在的任何空间中。它们被标记为“预配置”,并且您无法删除它们。

单击预配置的连接器会显示其描述,但不显示配置。
内置预配置连接器
编辑Kibana 提供以下内置的预配置连接器
预配置的警报历史 Elasticsearch 索引连接器
编辑此功能处于技术预览阶段,可能会在未来的版本中更改或删除。Elastic 将努力解决任何问题,但技术预览中的功能不受官方 GA 功能的支持 SLA 的约束。
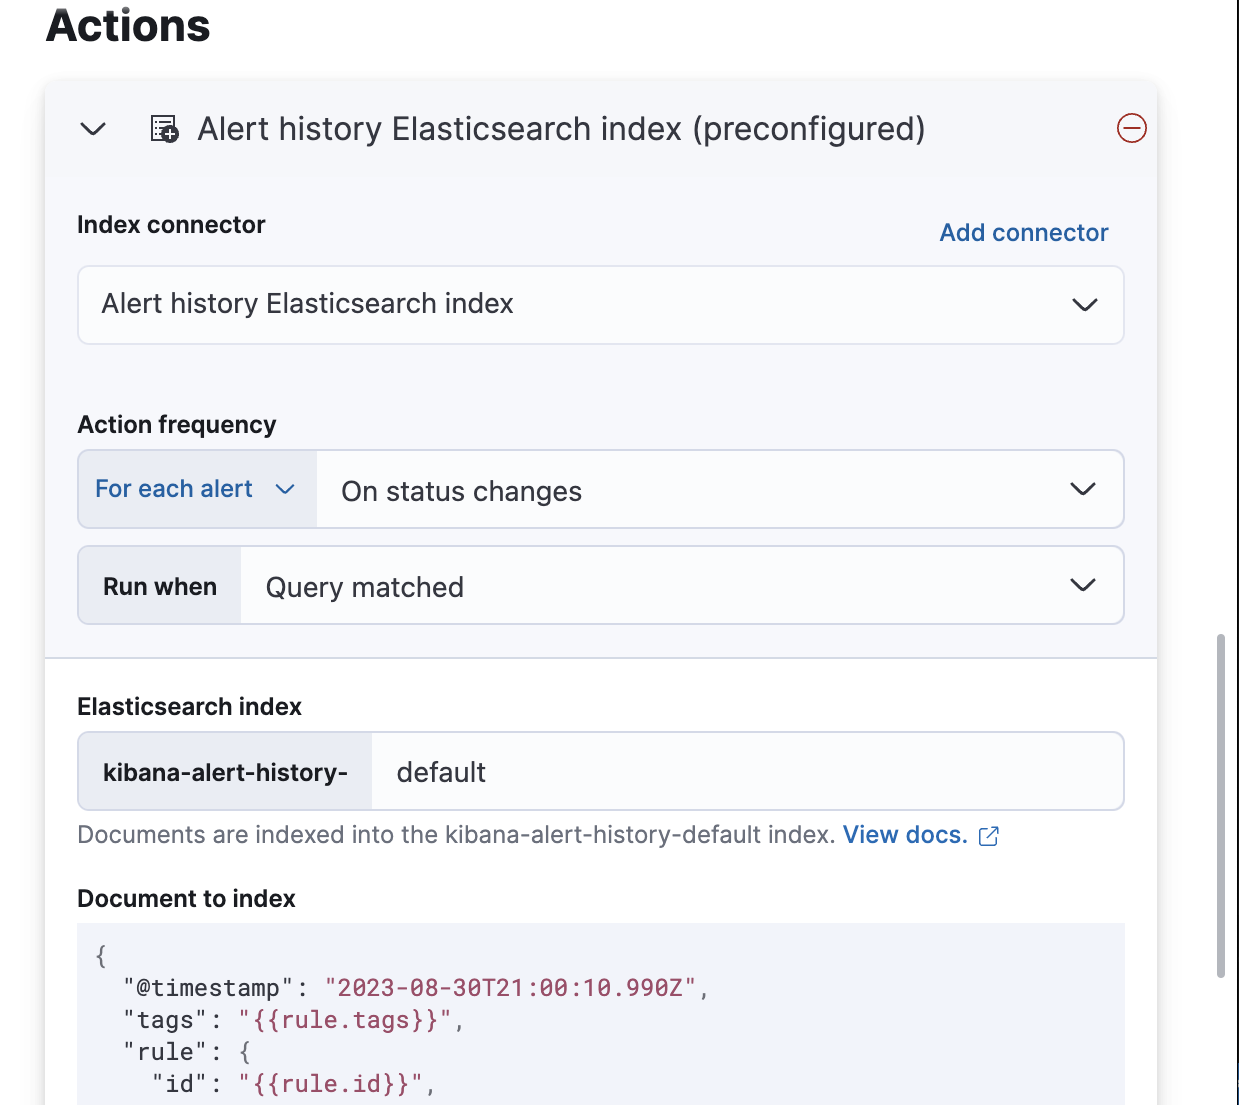
Kibana 提供了一个预配置的索引连接器,以方便将活动警报数据索引到 Elasticsearch 中。要使用此连接器,请将 xpack.actions.preconfiguredAlertHistoryEsIndex 设置为 true。
当您随后创建规则时,可以使用 警报历史 Elasticsearch 索引(预配置)连接器。

文档使用预配置的模式进行索引,该模式捕获规则可用的操作变量。默认情况下,这些文档将索引到 kibana-alert-history-default 索引中,但您可以指定不同的索引。索引名称必须以 kibana-alert-history- 开头才能利用预配置的警报历史索引模板。
- 要将文档写入预配置的索引,您必须对
kibana-alert-history-*索引拥有all或write权限。 kibana-alert-history-*索引未配置为使用 ILM,因此必须手动维护。如果索引大小增长过大,请考虑使用按查询删除 API 清理索引中的旧文档。
示例
编辑Amazon Bedrock 连接器
编辑以下示例创建了一个 Amazon Bedrock 连接器
xpack.actions.preconfigured:
  my-bedrock:
    name: preconfigured-bedrock-connector-type
    actionTypeId: .bedrock
    config:
      apiUrl: https://bedrock-runtime.us-east-1.amazonaws.com
      defaultModel: anthropic.claude-3-5-sonnet-20240620-v1:0
    secrets:
      accessKey: key-value
      secret: secret-value
|
Amazon Bedrock 请求 URL。 |
|
|
用于请求的默认模型。当前支持 Anthropic Claude 模型,默认为 Claude 2。 |
|
|
用于身份验证的 AWS 访问密钥。 |
|
|
用于身份验证的 AWS 密钥。 |
D3 Security 连接器
编辑以下示例创建了一个 D3 Security 连接器
xpack.actions.preconfigured:
  my-d3security:
    name: preconfigured-d3security-connector-type
    actionTypeId: .d3security
    config:
      url: https://testurl.com/elasticsearch/VSOC/api/Data/Kibana/Security%20Operations/CreateEvents
    secrets:
      token: superlongtoken
电子邮件连接器
编辑以下示例创建了一个 电子邮件连接器
xpack.actions.preconfigured:
  my-email:
    name: preconfigured-email-connector-type
    actionTypeId: .email
    config:
      service: other
      from: testsender@test.com
      host: validhostname
      port: 8080
      secure: false
      hasAuth: true
    secrets:
      user: testuser
      password: passwordkeystorevalue
|
电子邮件服务的名称。如果 |
|
|
使用此连接器发送的所有电子邮件的电子邮件地址。它必须以 |
|
|
服务提供商的主机名。 |
|
|
要连接到服务提供商的端口。 |
|
|
如果为 true,则在连接到服务提供商时,连接将使用 TLS。 |
|
|
如果为 |
|
|
用于身份验证的用户名。如果 |
|
|
用于身份验证的密码。应存储在 Kibana 密钥库 中。如果 |
Amazon SES(简单电子邮件服务)
编辑使用以下电子邮件连接器配置从 Amazon 简单电子邮件服务 (SES) SMTP 服务发送电子邮件
config:
    service: ses
    // `host`, `port` and `secure` have the following default values and do not need to set:
    // host: email-smtp.us-east-1.amazonaws.com
    // port: 465
    // secure: true
secrets:
    user: <username>
    password: <password>
Gmail
编辑使用以下电子邮件连接器配置从 Gmail SMTP 服务发送电子邮件
  config:
    service: gmail
    // `host`, `port` and `secure` have the following default values and do not need to set:
    // host: smtp.gmail.com
    // port: 465
    // secure: true
  secrets:
    user: <username>
    password: <password>
具有基本身份验证的 Microsoft Exchange
编辑[7.16.0] 在 7.16.0 中已弃用。此 Microsoft Exchange 配置已弃用,稍后将被删除,因为 Microsoft 正在弃用基本身份验证。
config:
    service: other
    host: <your exchange server>
    port: 465
    secure: true
    from: <email address of service account>
secrets:
    user: <email address of service account>
    password: <password>
具有 OAuth 2.0 的 Microsoft Exchange
编辑使用以下电子邮件连接器配置从 Microsoft Exchange 发送电子邮件
config:
    service: exchange_server
    clientId: <The Application (client) ID>
    tenantId: <The directory tenant ID, in GUID format.>
    from: <email address of service account>
secrets:
    clientSecret: <URL-encoded string>
|
此应用程序信息位于 Azure 门户 – 应用注册上。 |
|
|
某些组织配置 Exchange 以验证 |
Outlook.com
编辑使用以下电子邮件连接器配置从 Outlook.com SMTP 服务发送电子邮件
config:
    service: outlook365
    // `host`, `port` and `secure` have the following default values and do not need to set:
    // host: smtp.office365.com
    // port: 587
    // secure: false
secrets:
    user: <email.address>
    password: <password>
OpenAI 连接器
编辑以下示例创建了一个 OpenAI 连接器
xpack.actions.preconfigured:
  my-open-ai:
    name: preconfigured-openai-connector-type
    actionTypeId: .gen-ai
    config:
      apiUrl: https://api.openai.com/v1/chat/completions
      apiProvider: 'OpenAI'
      defaultModel: gpt-4o
    secrets:
      apiKey: superlongapikey
|
OpenAI 请求 URL。 |
|
|
OpenAI API 提供商,可以是 |
|
|
用于请求的默认模型。此设置是可选的,仅当 |
|
|
用于身份验证的 OpenAI 或 Azure OpenAI API 密钥。 |
IBM Resilient 连接器
编辑以下示例创建了一个 IBM Resilient 连接器
xpack.actions.preconfigured:
 my-resilient:
    name: preconfigured-resilient-connector-type
    actionTypeId: .resilient
    config:
      apiUrl: https://elastic.resilient.net
      orgId: ES
    secrets:
      apiKeyId: testuser
      apiKeySecret: tokenkeystorevalue
|
IBM Resilient 实例 URL。 |
|
|
IBM Resilient 组织标识符。 |
|
|
用于 HTTP 基本身份验证的身份验证密钥 ID。 |
|
|
用于 HTTP 基本身份验证的身份验证密钥密码。注意:此值应存储在 Kibana 密钥库 中。 |
索引连接器
编辑以下示例创建了一个 索引连接器
xpack.actions.preconfigured:
  my-index:
    name: preconfigured-index-connector-type
    actionTypeId: .index
    config:
      index: .kibana
      executionTimeField: my-field
Jira 连接器
编辑以下示例创建了一个 Jira 连接器
xpack.actions.preconfigured:
  my-jira:
    name: preconfigured-jira-connector-type
    actionTypeId: .jira
    config:
      apiUrl: https://elastic.atlassian.net
      projectKey: ES
    secrets:
      email: testuser
      apiToken: tokenkeystorevalue
|
Jira 实例 URL。 |
|
|
Jira 项目密钥。 |
|
|
用于 HTTP 基本身份验证的帐户电子邮件。 |
|
|
用于 HTTP 基本身份验证的 API 身份验证令牌。注意:此值应存储在 Kibana 密钥库 中。 |
Microsoft Teams 连接器
编辑以下示例创建一个 Microsoft Teams 连接器
xpack.actions.preconfigured:
  my-teams:
    name: preconfigured-teams-connector-type
    actionTypeId: .teams
    secrets:
      webhookUrl: 'https://outlook.office.com/webhook/abcd@0123456/IncomingWebhook/abcdefgh/ijklmnopqrstuvwxyz'
Opsgenie 连接器
编辑以下示例创建一个 Opsgenie 连接器
xpack.actions.preconfigured:
  my-opsgenie:
    name: preconfigured-opsgenie-connector-type
    actionTypeId: .opsgenie
    config:
      apiUrl: https://api.opsgenie.com
    secrets:
      apiKey: apikey
PagerDuty 连接器
编辑以下示例创建一个 PagerDuty 连接器
xpack.actions.preconfigured:
  my-pagerduty:
    name: preconfigured-pagerduty-connector-type
    actionTypeId: .pagerduty
    config:
      apiUrl: https://test.host
    secrets:
      routingKey: testroutingkey
服务器日志连接器
编辑以下示例创建一个 服务器日志连接器
xpack.actions.preconfigured:
  my-server-log:
    name: preconfigured-server-log-connector-type
    actionTypeId: .server-log
ServiceNow ITOM 连接器
编辑以下示例创建一个使用基本身份验证的 ServiceNow ITOM 连接器
xpack.actions.preconfigured:
  my-servicenow-itom:
    name: preconfigured-servicenow-connector-type
    actionTypeId: .servicenow-itom
    config:
      apiUrl: https://example.service-now.com/
    secrets:
      username: testuser
      password: passwordkeystorevalue
|
ServiceNow 实例 URL。 |
|
|
用户名。 |
|
|
密码。注意:此值应存储在 Kibana 密钥库 中。 |
以下示例创建一个使用 OAuth 身份验证的 ServiceNow ITOM 连接器
xpack.actions.preconfigured:
  my-servicenow:
    name: preconfigured-oauth-servicenow-connector-type
    actionTypeId: .servicenow-itom
    config:
      apiUrl: https://example.service-now.com/
      isOAuth: true
      userIdentifierValue: testuser@email.com
      clientId: abcdefghijklmnopqrstuvwxyzabcdef
      jwtKeyId: fedcbazyxwvutsrqponmlkjihgfedcba
    secrets:
      clientSecret: secretsecret
      privateKey: |
        -----BEGIN RSA PRIVATE KEY-----
        MIIE...
        KAgD...
        ... multiple lines of key data ...
        -----END RSA PRIVATE KEY-----
|
指定连接器是使用基本身份验证还是 OAuth 身份验证。 |
|
|
用户标识符。 |
|
|
分配给您的 OAuth 应用程序的客户端标识符。 |
|
|
分配给您的 OAuth 应用程序的 JWT 验证器映射的密钥标识符。 |
|
|
分配给您的 OAuth 应用程序的客户端密钥。 |
|
|
多行格式的 RSA 私钥。如果它有密码,您还必须提供 |
ServiceNow ITSM 连接器
编辑以下示例创建一个使用基本身份验证的 ServiceNow ITSM 连接器
xpack.actions.preconfigured:
  my-servicenow:
    name: preconfigured-servicenow-connector-type
    actionTypeId: .servicenow
    config:
      apiUrl: https://example.service-now.com/
      usesTableApi: false
    secrets:
      username: testuser
      password: passwordkeystorevalue
|
ServiceNow 实例 URL。 |
|
|
指定连接器是使用 Table API 还是 Import Set API。如果 |
|
|
用户名。 |
|
|
密码。注意:此值应存储在 Kibana 密钥库 中。 |
以下示例创建一个使用 OAuth 身份验证的 ServiceNow ITSM 连接器
xpack.actions.preconfigured:
  my-servicenow:
    name: preconfigured-oauth-servicenow-connector-type
    actionTypeId: .servicenow
    config:
      apiUrl: https://example.service-now.com/
      usesTableApi: false
      isOAuth: true
      userIdentifierValue: testuser@email.com
      clientId: abcdefghijklmnopqrstuvwxyzabcdef
      jwtKeyId: fedcbazyxwvutsrqponmlkjihgfedcba
    secrets:
      clientSecret: secretsecret
      privateKey: |
        -----BEGIN RSA PRIVATE KEY-----
        MIIE...
        KAgD...
        ... multiple lines of key data ...
        -----END RSA PRIVATE KEY-----
|
指定连接器是使用基本身份验证还是 OAuth 身份验证。 |
|
|
用户标识符。 |
|
|
分配给您的 OAuth 应用程序的客户端标识符。 |
|
|
分配给您的 OAuth 应用程序的 JWT 验证器映射的密钥 ID。 |
|
|
分配给 OAuth 应用程序的客户端密钥。 |
|
|
多行格式的 RSA 私钥。如果它有密码,您还必须提供 |
ServiceNow SecOps 连接器
编辑以下示例创建一个使用基本身份验证的 ServiceNow SecOps 连接器
xpack.actions.preconfigured:
  my-servicenow-sir:
    name: preconfigured-servicenow-connector-type
    actionTypeId: .servicenow-sir
    config:
      apiUrl: https://example.service-now.com/
      usesTableApi: false
    secrets:
      username: testuser
      password: passwordkeystorevalue
|
ServiceNow 实例 URL。 |
|
|
指定连接器是使用 Table API 还是 Import Set API。如果 |
|
|
用户名。 |
|
|
密码。注意:此值应存储在 Kibana 密钥库 中。 |
以下示例创建一个使用 OAuth 身份验证的 ServiceNow SecOps 连接器
xpack.actions.preconfigured:
  my-servicenow:
    name: preconfigured-oauth-servicenow-connector-type
    actionTypeId: .servicenow-sir
    config:
      apiUrl: https://example.service-now.com/
      usesTableApi: false
      isOAuth: true
      userIdentifierValue: testuser@email.com
      clientId: abcdefghijklmnopqrstuvwxyzabcdef
      jwtKeyId: fedcbazyxwvutsrqponmlkjihgfedcba
    secrets:
      clientSecret: secretsecret
      privateKey: |
        -----BEGIN RSA PRIVATE KEY-----
        MIIE...
        KAgD...
        ... multiple lines of key data ...
        -----END RSA PRIVATE KEY-----
|
指定连接器是使用基本身份验证还是 OAuth 身份验证。 |
|
|
用户标识符。 |
|
|
分配给 OAuth 应用程序的客户端标识符。 |
|
|
分配给您的 OAuth 应用程序的 JWT 验证器映射的密钥 ID。 |
|
|
分配给 OAuth 应用程序的客户端密钥。 |
|
|
多行格式的 RSA 私钥。如果它有密码,您还必须指定 |
Slack 连接器
编辑以下示例创建一个使用 Webhook 的 Slack 连接器
xpack.actions.preconfigured:
  my-slack:
    name: preconfigured-slack-webhook-connector-type
    actionTypeId: .slack
    secrets:
      webhookUrl: 'https://hooks.slack.com/services/xxxx/xxxx/xxxx'
以下示例创建一个使用 Web API 的 Slack 连接器
xpack.actions.preconfigured:
  my-slack:
    name: preconfigured-slack-api-connector-type
    actionTypeId: .slack_api
    secrets:
      token: 'xoxb-xxxx-xxxx-xxxx'
Swimlane 连接器
编辑以下示例创建一个 Swimlane 连接器
xpack.actions.preconfigured:
  my-swimlane:
    name: preconfigured-swimlane-connector-type
    actionTypeId: .swimlane
    config:
      apiUrl: https://elastic.swimlaneurl.us
      appId: app-id
      mappings:
        alertIdConfig:
          fieldType: text
          id: agp4s
          key: alert-id
          name: Alert ID
        caseIdConfig:
          fieldType: text
          id: ae1mi
          key: case-id
          name: Case ID
        caseNameConfig:
          fieldType: text
          id: anxnr
          key: case-name
          name: Case Name
        commentsConfig:
          fieldType: comments
          id: au18d
          key: comments
          name: Comments
        descriptionConfig:
          fieldType: text
          id: ae1gd
          key: description
          name: Description
        ruleNameConfig:
          fieldType: text
          id: avfsl
          key: rule-name
          name: Rule Name
        severityConfig:
          fieldType: text
          id: a71ik
          key: severity
          name: severity
    secrets:
      apiToken: tokenkeystorevalue
|
Swimlane 实例 URL。 |
|
|
Swimlane 应用程序标识符。 |
|
|
用于属性(例如警报标识符、严重性和规则名称)的字段映射。 |
|
|
用于 HTTP 基本身份验证的 API 身份验证令牌。注意:此值应存储在 Kibana 密钥库 中。 |
Tines 连接器
编辑以下示例创建一个 Tines 连接器
xpack.actions.preconfigured:
my-tines:
    name: preconfigured-tines-connector-type
    actionTypeId: .tines
    config:
      url: https://some-tenant-2345.tines.com
    secrets:
      email: some.address@test.com
      token: ausergeneratedapitoken
Torq 连接器
编辑以下示例创建一个 Torq 连接器
xpack.actions.preconfigured:
  my-torq:
    name: preconfigured-torq-connector-type
    actionTypeId: .torq
    config:
      webhookIntegrationUrl: https://hooks.torq.io/v1/somehook
    secrets:
      token: mytorqtoken
Webhook 连接器
编辑以下示例创建一个使用基本身份验证的 Webhook 连接器
xpack.actions.preconfigured:
  my-webhook:
    name: preconfigured-webhook-connector-type
    actionTypeId: .webhook
    config:
      url: https://test.host
      method: post
      headers:
        testheader: testvalue
      hasAuth: true
    secrets:
      user: testuser
      password: passwordkeystorevalue
|
Web 服务请求 URL。如果您使用的是 |
|
|
HTTP 请求方法,可以是 |
|
|
一组以键值对形式发送的请求标头。 |
|
|
如果为 |
|
|
有效的用户名。如果 |
|
|
有效的密码。如果 |
预配置的 Webhook 连接器不支持 SSL 身份验证。
Webhook - 案例管理连接器
编辑以下示例创建一个 Webhook - 案例管理连接器
xpack.actions.preconfigured:
  my-case-management-webhook:
    name: Case Management Webhook Connector
    actionTypeId: .cases-webhook
    config:
      hasAuth: true
      headers:
        'content-type': 'application/json'
      createIncidentUrl: 'https://example.com/rest/api/2/issue'
      createIncidentMethod: 'post'
      createIncidentJson: '{"fields":{"summary":{{{case.title}}},"description":{{{case.description}}},"labels":{{{case.tags}}}'
      getIncidentUrl: 'https://example.com/rest/api/2/issue/{{{external.system.id}}}'
      getIncidentResponseExternalTitleKey: 'key'
      viewIncidentUrl: 'https://example.com/browse/{{{external.system.title}}}'
      updateIncidentUrl: 'https://example.com/rest/api/2/issue/{{{external.system.id}}}'
      updateIncidentMethod: 'put'
      updateIncidentJson: '{"fields":{"summary":{{{case.title}}},"description":{{{case.description}}},"labels":{{{case.tags}}}'
      createCommentMethod: 'post',
      createCommentUrl: 'https://example.com/rest/api/2/issue/{{{external.system.id}}}/comment',
      createCommentJson: '{"body": {{{case.comment}}}}',
    secrets:
      user: testuser
      password: passwordvalue
|
如果 |
|
|
一组以键值对形式发送的请求标头。 |
|
|
用于在第三方系统中创建案例的 REST API URL 字符串。 |
|
|
用于在第三方系统中创建案例的 REST API HTTP 请求方法。 |
|
|
发送到创建案例 URL 以创建案例的带有 Mustache 变量的字符串化 JSON 有效负载。 |
|
|
带有外部服务 ID Mustache 变量的 REST API URL 字符串,用于从第三方系统获取案例。 |
|
|
来自 get 案例方法响应主体的字符串,对应于外部服务标题。 |
|
|
带有外部服务 ID 或外部服务标题 Mustache 变量的 URL 字符串,用于在外部系统中查看案例。 |
|
|
用于在第三方系统中按 ID 更新案例的 REST API URL。 |
|
|
用于在第三方系统中更新案例的 REST API HTTP 请求方法。 |
|
|
发送到更新案例 URL 以更新案例的带有 Mustache 变量的字符串化 JSON 有效负载。 |
|
|
用于在第三方系统中创建案例注释的 REST API HTTP 请求方法。 |
|
|
用于在第三方系统中按 ID 创建案例注释的 REST API URL 字符串。 |
|
|
发送到创建注释 URL 以创建案例注释的带有 Mustache 变量的字符串化 JSON 有效负载。 |
|
|
用户名,当 |
|
|
密码,当 |
xMatters 连接器
编辑以下示例创建一个使用基本身份验证的 xMatters 连接器
xpack.actions.preconfigured:
  my-xmatters:
    name: preconfigured-xmatters-connector-type
    actionTypeId: .xmatters
    config:
      configUrl: https://test.host
      usesBasic: true
    secrets:
      user: testuser
      password: passwordkeystorevalue
|
xMatters 中 Elastic Alerts 触发器的请求 URL。 |
|
|
指示连接器是否使用 HTTP 基本身份验证。如果 |
|
|
用于身份验证的用户名,当 |
|
|
用于身份验证的密码,当 |
以下示例创建一个使用 URL 身份验证的 xMatters 连接器
On this page
- 创建预配置连接器
- 查看预配置连接器
- 内置预配置连接器
- 预配置的警报历史 Elasticsearch 索引连接器
- 示例
- Amazon Bedrock 连接器
- D3 Security 连接器
- 电子邮件连接器
- Amazon SES(简单电子邮件服务)
- Gmail
- 具有基本身份验证的 Microsoft Exchange
- 具有 OAuth 2.0 的 Microsoft Exchange
- Outlook.com
- OpenAI 连接器
- IBM Resilient 连接器
- 索引连接器
- Jira 连接器
- Microsoft Teams 连接器
- Opsgenie 连接器
- PagerDuty 连接器
- 服务器日志连接器
- ServiceNow ITOM 连接器
- ServiceNow ITSM 连接器
- ServiceNow SecOps 连接器
- Slack 连接器
- Swimlane 连接器
- Tines 连接器
- Torq 连接器
- Webhook 连接器
- Webhook - 案例管理连接器
- xMatters 连接器